테스트와 문서화 한꺼번에 하기 위한 REST Docs 적용기
들어가며
먼 옛날 Spring REST Docs 설정을 마치고 언젠가 이를 적용하는 글을 작성하려고 했는데 마침 간단한 게시판 API를 구현하게 돼서 겸사겸사 Spring REST Docs 적용기를 작성하고자 한다.
요구사항
- 문서에 request-parameters 에 대한 정보를 남기고 optional 여부를 나타낸다.
- 문서에 path-parameters 에 대한 정보를 남긴다.
- 문서에 필요한 헤더 정보에 대한 정보를 남기고 optional 여부를 나타낸다.
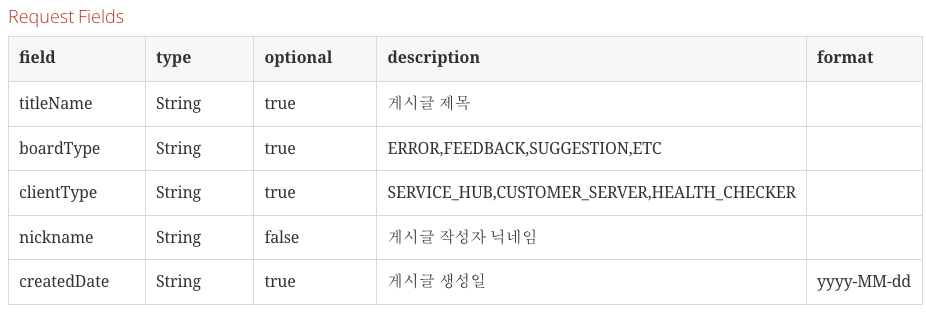
- 문서에 request field 에 대한 정보를 남기고 optional 여부와 format 을 나타낸다.
- 문서에 response field 에 대한 정보를 남긴다.
- 오류 응답에 대한 문서도 작성한다.
참고사항
API 테스트, 문서화를 위한 기본 설정
1
2
3
4
5
6
7
8
9
10
11
12
13
14
15
16
17
18
19
20
21
22
23
24
25
26
27
28
29
30
31
@AutoConfigureMockMvc
@SpringBootTest
@AutoConfigureRestDocs(uriHost = "api.impati-board.com", uriPort = 80)
@ExtendWith(RestDocumentationExtension.class)
class ArticleControllerTest {

    @Autowired
    private MockMvc mockMvc; // @AutoConfigureMockMvc 으로 주입 받아 자동 설정 MockMvc 를 사용

    @Autowired
    private ObjectMapper objectMapper; // Object to Json 을 위한 주입

    // 실제 동작X 응답을 지정하기위해 @MockBean 을 사용
    @MockBean
    private ArticleFinder articleFinder;

    @MockBean
    private CustomerFetcher customerFetcher; // 사용자 서버로부터 Customer 정보를 가져오는 역할

    @MockBean
    private ArticleRegister articleRegister;

    @MockBean
    private ArticleEditor articleEditor;

    @MockBean
    private ArticleRemover articleRemover;

		...
		...
}
인증
AuthenticationCustomer는 인증된 사용자를 나타내며 X-AUTH 헤더에 유효한 토큰을 보내야한다.Customer는 인증, 인증되지 않은 사용자를 나타내는 인터페이스- 게시글 페이징 조회에서는 인증 여부를 체크하지 않는다.
- 게시글 단일 조회에서는 인증 ,인증되지 않은 사용자 모두 요청할 수 있다.
- 게시글 등록 , 수정 ,삭제는 인증된 사용자만이 요청할 수 있다.
결과 응답 공통 포맷
1
2
3
4
5
6
7
8
9
10
11
12
13
14
15
16
17
18
19
20
21
22
23
24
25
26
27
28
29
30
31
32
33
34
35
36
@Getter
public class ApiResult<T> {

    private T data;

    private ErrorData error;

    ApiResult(T data) {
        this.data = data;
    }

    ApiResult(int status, String message) {
        this.data = null;
        this.error = new ErrorData(status, message);
    }

    public static <T> ApiResult<T> succeed(T data) {
        return new ApiResult<>(data);
    }

    public static ApiResult<String> succeed() {
        return new ApiResult<>("Success");
    }

    public static <T> ApiResult<T> failed(int status, String message) {
        return new ApiResult<>(status, message);
    }

    @Getter
    @NoArgsConstructor
    @AllArgsConstructor
    static class ErrorData {
        private int status;
        private String message;
    }
}
- API 요청에 대한 응답 값이 있는 경우 data 에 넣어주고 error 필드는 null 값을 가진다.
- API 요청에 대한 응답 값이 없는 경우 String 타입의 data 에 “Success” 를 넣어주고 error 필드는 null 값을 가진다.
- API 요청에 에러가 발생한 경우 data 필드는 null 값을 가지고 error.status 에 코드 error.message 에 에러 메시지를 나타낸다.
static import
MockMvcRequestBuilder대신RestDocumentationRequestBuilder를 사용해야 매개변수 문서화를 수행할 수 있으므로RestDocumentationRequestBuilder를 static import 후 사용preprocessRequest,preprocessResponse:Preprocessors의 static importpathParameters,parameterWithNamerelaxedRequestParameters:RequestDocumentation의 static importheaderWithName,requestHeaders:HeaderDocumentation의 static importresponseFields ,fieldWithPath,requestFields:PayloadDocumentation의 static import
게시글 페이징 조회 예시
1
2
3
4
5
6
7
8
9
10
11
POST /api/v1/articles?size=10&page=0 HTTP/1.1
Content-Type: application/json;charset=UTF-8
Host: api.impati-board.com

{
  "titleName" : "안녕하세요",
  "boardType" : "ERROR",
  "clientType" : "CUSTOMER_SERVER",
  "nickname" : "impati",
  "createdDate" : "2023-06-16"
}
검색 조건을 데이터를 RequestBody 에 page , size 정보를 RequestParam 에 설정해준뒤 요청을 보내는 API 이다.
- 컨트롤러
1
2
3
4
5
6
7
8
9

    @PostMapping
    public ApiResult<Page<ArticleResponse>> searchArticles(@RequestBody ArticleSearchRequest request,
                                                           @PageableDefault Pageable pageable) {
        Page<ArticleResponse> response = articleFinder
                .search(request.toCondition(pageable))
                .map(ArticleResponse::from);
        return ApiResult.succeed(response);
    }
- 테스트 구성
1
2
3
4
5
6
7
8
9
10
11
12
13
14
15
16
17
18
19
20
21
22
23
24
25
26
27
28
29
30
31
mockMvc.perform(post("/api/v1/articles")
                        .contentType(MediaType.APPLICATION_JSON)
                        .param("size", String.valueOf(pageable.getPageSize()))
                        .param("page", String.valueOf(pageable.getOffset()))
                        .content(objectMapper.writeValueAsString(request)))
                .andDo(document(
                  <1>   "article/",
                  <2>   preprocessRequest(Preprocessors.prettyPrint()),
                        preprocessResponse(Preprocessors.prettyPrint()),
                  <3>   relaxedRequestParameters(
                                parameterWithName("size").description("페이지 사이즈").optional(),
                                parameterWithName("page").description("페이지 번호").optional()),
                  <4>   requestFields(
                                fieldWithPath("titleName").type(JsonFieldType.STRING).optional().description("게시글 제목"),
                                fieldWithPath("boardType").type(JsonFieldType.STRING).optional().description("ERROR,FEEDBACK,SUGGESTION,ETC"),
                                fieldWithPath("clientType").type(JsonFieldType.STRING).optional().description("SERVICE_HUB,CUSTOMER_SERVER,HEALTH_CHECKER"),
                                fieldWithPath("nickname").type(JsonFieldType.STRING).description("게시글 작성자 닉네임"),
                                fieldWithPath("createdDate").type(JsonFieldType.STRING).optional().description("게시글 생성일")
                                        .attributes(new Attributes.Attribute("format", "yyyy-MM-dd"))),
                  <5>    responseFields(
                                fieldWithPath("data.content[].articleId").description("게시글 ID"),
                                fieldWithPath("data.content[].title").description("게시글 제목"),
                                fieldWithPath("data.content[].boardType").description("ERROR,FEEDBACK,SUGGESTION,ETC"),
                                fieldWithPath("data.content[].clientType").description("SERVICE_HUB,CUSTOMER_SERVER,HEALTH_CHECKER"),
                                fieldWithPath("data.content[].nickname").description("게시글 작성자 닉네임"),
                                fieldWithPath("data.content[].createdAt").description("게시글 생성일"),
                                fieldWithPath("data.pageable.page").description("현재 페이지"),
                                fieldWithPath("data.pageable.size").description("페이지 사이즈"),
                                fieldWithPath("data.pageable.sort.orders").description(" - "),
                                fieldWithPath("data.total").description("게시글 총 수"),
                                fieldWithPath("error").type(JsonFieldType.NULL).description("에러 필드"))));
- <1> : build/generated-snippets/articles 에 스니펫을 생성
- <2> : Json 예쁘게 출력
<3> : request-parameter 문서화를 위해서 parameterWithName 에 param-name, description 에 설명 , optional 설정해준다.
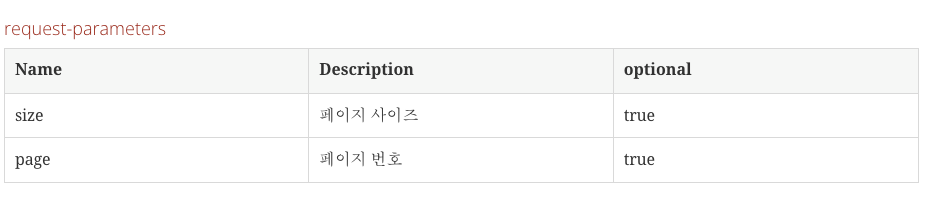 optional 여부는 기본 설정이 아니므로 커스텀하게 스니펫을 생성해줘야한다.
이를 위해서는src/test/resources/org/springframework/restdocs/templates하위에request-parameters.snippet을 다음과 같이 구성해주면 된다. 이러한 사실은 공식 문서 에서 알아볼 수 있다.src/test/resources/org/springframework/restdocs/templates/request-parameters.snippet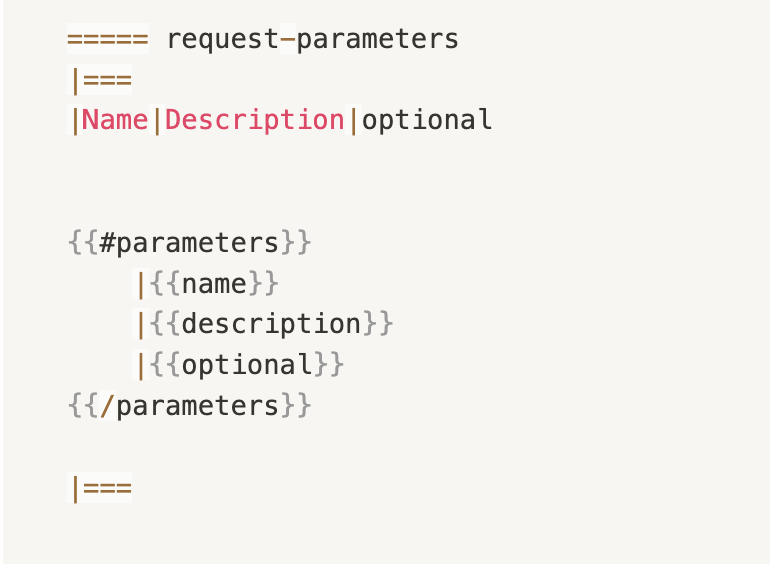
<4> : : requestFields 문서화를 위해서 fieldWithPath 에는 필드 네임을 , type , description 에 설명 , optional , 필요한 경우 format도 설정해준다.
 마찬가지로 optional , format 의 경우 같은 구성을 해주어야한다.
 src/test/resources/org/springframework/restdocs/templates/request-fields.snippet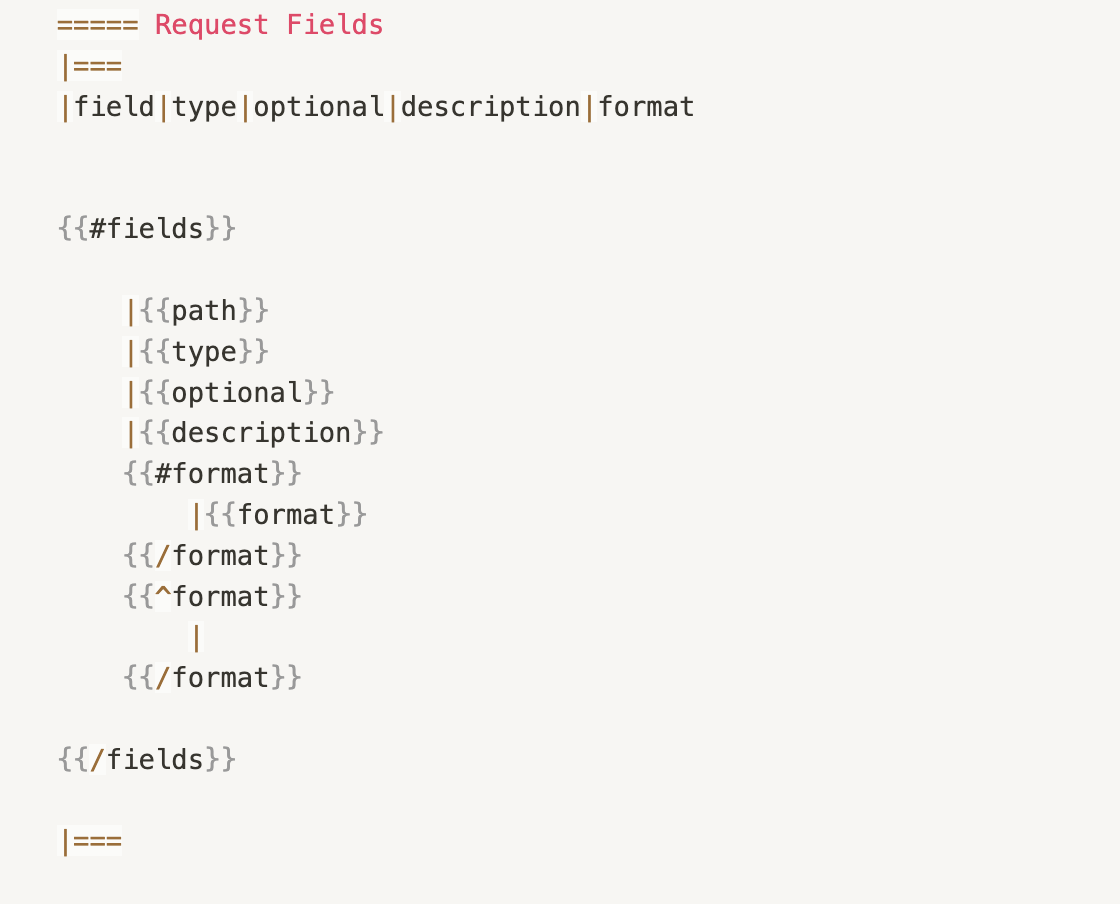 Mustache 문법을 잘 모르기때문에 조금 지저분해 보이지만 format 구성이 별도로 없는 경우에는 아무것도 출력하지 않도록 설정했다. boardType , clientType 같은 경우 프로젝트에서는 Enum 이므로 별도로 구성해야하지만 description 을 통해서도 어느정도 입력 값을 표현할 수 있다고 생각한다.
- <5> : responseFields 문서화를 위해 응답을 모두 지정해주어야한다. 그렇지 않으면 테스트를 실패한다. 응답 필드 같은 경우 별도의 커스텀한 구성을 수행하지 않았다.
놀랍게도 벌써 요구사항의 3가지를 성공했다.
문서에 request-parameters 에 대한 정보를 남기고 optional 여부를 나타낸다.- 문서에 path-parameters 에 대한 정보를 남긴다.
- 문서에 필요한 헤더 정보에 대한 정보를 남기고 optional여부를 나타낸다.
문서에 request field 에 대한 정보를 남기고 optional여부와 format 를 나타낸다.문서에 response field 에 대한 정보를 남긴다.- 오류 응답에 대한 문서도 작성한다.
게시글 삭제 예시
게시글 수정 , 삭제 , 등록은 흐름이 비슷하기 때문에 게시글 삭제 예시로 나머지 요구사항을 표현한다.
게시글 삭제를 위해서는 게시글 ID 가 필요하며 X-AUTH 헤더에 토큰도 필요하다.
- 컨트롤러
1
2
3
4
5
6
7

    @DeleteMapping("/{articleId}")
    public ApiResult<String> removeArticle(@PathVariable Long articleId,
                                           AuthenticationCustomer authenticationCustomer) {
        articleRemover.remove(articleId, authenticationCustomer.getId());
        return ApiResult.succeed();
    }
- 테스트 구성
1
2
3
4
5
6
7
8
9
10
11
12
13
14
mockMvc.perform(delete("/api/v1/articles/{articleId}", article.getId())
                        .contentType(MediaType.APPLICATION_JSON)
                        .header("X-AUTH", token))
                .andDo(document(
                        "article/remove",
                        preprocessRequest(Preprocessors.prettyPrint()),
                        preprocessResponse(Preprocessors.prettyPrint()),
                 <1>    pathParameters(
                                parameterWithName("articleId").description("게시글 ID")),
                 <2>    requestHeaders(
                                headerWithName("X-AUTH").description("인증 헤더 이름")),
                        responseFields(
                                fieldWithPath("data").type(JsonFieldType.STRING).description("응답 상태"),
                                fieldWithPath("error").type(JsonFieldType.NULL).description("에러 필드"))));
- <1> : pathParameters 문서화를 위한 구성이고 pathParameters 경우에는 항상 필수 값이므로 optional 설정 없이 기본 설정으로 간다.

- <2> : request 헤더 문서화를 위한 구성으로 optional 설정을 가져가지만 따로 설정하지 않으면 기본이 false 이다.

src/test/resources/org/springframework/restdocs/templates/request-headers.snippet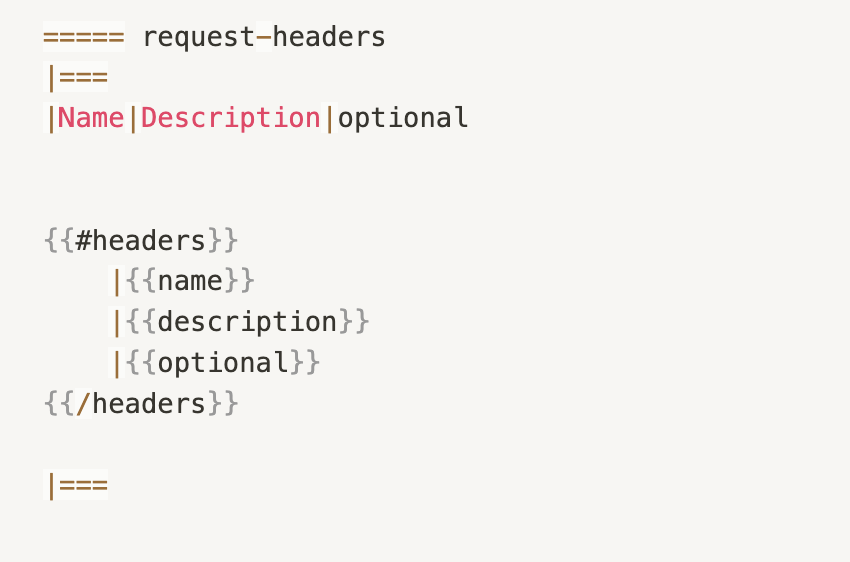
문서에 request-parameters 에 대한 정보를 남기고 optional 여부를 나타낸다.문서에 path-parameters 에 대한 정보를 남긴다.문서에 필요한 헤더 정보에 대한 정보를 남기고 optional여부를 나타낸다.문서에 request field 에 대한 정보를 남기고 optional여부와 format 를 나타낸다.문서에 response field 에 대한 정보를 남긴다.- 오류 응답에 대한 문서도 작성한다.
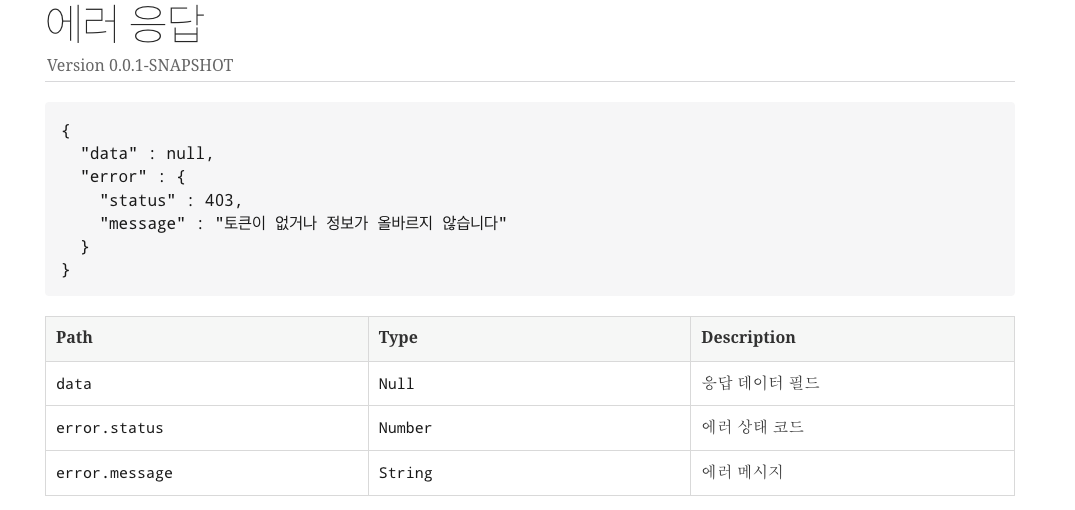
오류 응답 문서화
게시글 삭제 시 반드시 유효한 토큰을 헤더에 넣어줘야 하는데 유효하지 않은 토큰을 넣어주며 에러 응답 테스트를 진행하면서 문서화도 해보자.
토큰이 유효하지 않을 시 NormalExceptionHandler 에서 응답을 처리한다.
1
2
3
4
5
6
7
8
@RestControllerAdvice
public class NormalExceptionHandler {

    @ExceptionHandler(BoardApiException.class)
    public ApiResult<Void> boardException(BoardApiException exception) {
        return ApiResult.failed(exception.getStatus(), exception.getMessage());
    }
}
- 테스트 구성
1
2
3
4
5
6
7
8
9
10
11
12
13
14
15
mockMvc.perform(delete("/api/v1/articles/{articleId}", article.getId())
                        .contentType(MediaType.APPLICATION_JSON)
                        .header("X-AUTH", token + "noisy")) // 유효하지 않은 토큰
                .andDo(document(
                        "error",
                        preprocessRequest(Preprocessors.prettyPrint()),
                        preprocessResponse(Preprocessors.prettyPrint()),
                        pathParameters(
                                parameterWithName("articleId").description("게시글 ID")),
                        requestHeaders(
                                headerWithName("X-AUTH").description("인증 헤더 이름")),
                        responseFields(
                                fieldWithPath("data").type(JsonFieldType.NULL).description("응답 데이터 필드"),
                                fieldWithPath("error.status").type(JsonFieldType.NUMBER).description("에러 상태 코드"),
                                fieldWithPath("error.message").type(JsonFieldType.STRING).description("에러 메시지"))));
문서에 request-parameters 에 대한 정보를 남기고 optional 여부를 나타낸다.문서에 path-parameters 에 대한 정보를 남긴다.문서에 필요한 헤더 정보에 대한 정보를 남기고 optional여부를 나타낸다.문서에 request field 에 대한 정보를 남기고 optional여부와 format 를 나타낸다.문서에 response field 에 대한 정보를 남긴다.오류 응답에 대한 문서도 작성한다.
요구사항 완료!
모든 코드는 https://github.com/impati/impati-board 에서 확인할 수 있습니다.
마무리하며
기본적인 문서화에 대해 정리해보았다.